Unlock Your Freebox: Bloqué Etape 3 – The Ultimate Guide To Getting Back Online
Hey there, tech warrior! Are you stuck with a freebox bloqué at step 3? Don’t panic; you’re not alone. Thousands of Freebox users face this issue every day, and it can be super frustrating when your internet decides to take a break just when you need it most. Whether you’re trying to stream your favorite Netflix show or finish that urgent work project, a blocked Freebox can throw a serious wrench into your plans. But guess what? You’ve come to the right place. We’re about to dive deep into the world of Freebox troubleshooting, and by the end of this guide, you’ll have all the tools you need to get back online in no time.
Let’s face it, internet issues are like that annoying friend who shows up uninvited – they always pop up at the worst possible moment. But unlike that friend, internet problems don’t have to stick around. Understanding why your Freebox is bloqué at step 3 is the first step toward fixing it. Whether it’s a simple router glitch or something more complex, we’ve got you covered. So grab a coffee, sit back, and let’s tackle this issue head-on.
Before we dive into the nitty-gritty of troubleshooting, let’s talk about why this issue matters. In today’s digital world, having a reliable internet connection is more important than ever. From remote work to online education, our lives revolve around being connected. A Freebox bloqué at step 3 isn’t just an inconvenience; it’s a roadblock that can stop you from getting things done. But don’t worry, we’ve got a plan. By the end of this article, you’ll be back in the game, streaming, browsing, and working like a pro.
- Leg Curl The Ultimate Guide To Strengthening Your Hamstrings
- Coca Vin Rouge The Ultimate Guide To This Trendy Beverage
Understanding Freebox Bloqué Etape 3
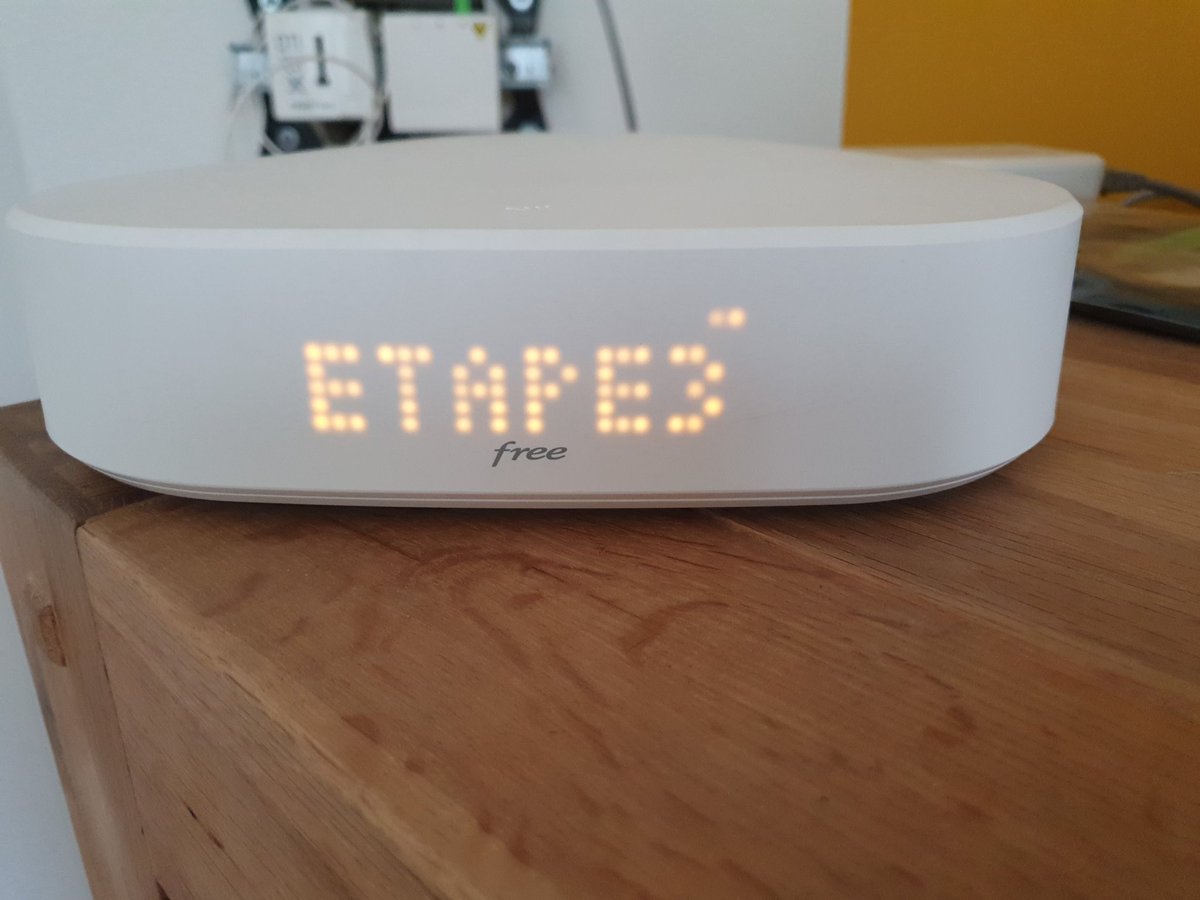
Alright, let’s break it down. When your Freebox is bloqué at step 3, it means your router is stuck during the initialization process. This can happen for a variety of reasons, from software glitches to hardware issues. But before we get into the solutions, let’s first understand what step 3 actually means. During the boot-up process, your Freebox goes through several stages, and step 3 is where it checks for firmware updates and establishes a connection with your ISP. If something goes wrong here, your Freebox won’t connect to the internet.
Common Causes of Freebox Bloqué at Step 3
Now that we know what step 3 is, let’s talk about why your Freebox might be stuck there. Here are some common culprits:
- Firmware Issues: Your Freebox might be trying to download an update, but something went wrong.
- ISP Problems: Sometimes, the issue isn’t with your Freebox but with your internet service provider.
- Router Overheating: If your Freebox has been running non-stop for days, it might be overheating, causing it to freeze.
- Hardware Failure: In rare cases, the problem could be with the actual hardware, like a faulty Ethernet port or damaged internal components.
Identifying the root cause is key to fixing the problem, so let’s dive deeper into each of these potential issues.
- Bobbi Althoff Leaks The Untold Story You Need To Know
- Nude Tiktok Unpacking The Trend Controversy And What It Really Means
Step-by-Step Troubleshooting Guide
Ready to fix your Freebox? Let’s walk through a step-by-step guide to get you back online. This process might take a bit of time, but trust us, it’s worth it.
Step 1: Restart Your Freebox
Before you do anything else, try the classic tech fix: turn it off and on again. Sometimes, a simple reboot is all your Freebox needs to reset and start working properly. Here’s how to do it:
- Unplug your Freebox from the power source.
- Wait for about 30 seconds.
- Plug it back in and let it boot up completely.
If your Freebox still gets stuck at step 3, don’t worry. We’ve got more steps coming up.
Step 2: Check for Firmware Updates
Firmware issues are one of the most common reasons for a Freebox bloqué at step 3. Here’s how to check for updates:
- Log in to your Freebox’s web interface.
- Go to the settings menu and check for available updates.
- Install any pending updates and reboot your Freebox.
If the firmware update doesn’t fix the issue, it’s time to move on to the next step.
Advanced Troubleshooting Techniques
Still stuck? Let’s try some more advanced troubleshooting methods.
Step 3: Reset Your Freebox
A factory reset can solve a lot of issues, but be warned: it will erase all your custom settings. Here’s how to do it:
- Unplug your Freebox from the power source.
- Press and hold the reset button (usually located at the back of the device) for about 10 seconds.
- Plug it back in and let it boot up.
Once your Freebox is reset, you’ll need to reconfigure it using the Freebox Manager app or website.
Step 4: Check Your ISP Connection
Sometimes, the issue isn’t with your Freebox but with your ISP. Here’s how to check:
- Call your ISP’s customer support and ask if there are any known outages in your area.
- Check the status of your internet connection by looking for any error messages on your Freebox’s display.
If your ISP is down, there’s not much you can do except wait for them to fix it. But if everything checks out on their end, it’s time to move on to the next step.
Hardware Diagnostics
Still having trouble? It might be time to take a closer look at the hardware. Here’s how to diagnose potential hardware issues:
Step 5: Inspect Your Freebox
Take a look at your Freebox and check for any visible signs of damage. Look for:
- Loose cables
- Cracked or broken ports
- Signs of overheating, like burn marks or excessive heat
If you find any issues, it might be time to replace your Freebox or contact Freebox support for further assistance.
Step 6: Test with a Different Router
If you have access to another router, try connecting it to your ISP to see if the issue persists. This will help you determine if the problem is with your Freebox or your ISP.
Preventing Future Issues
Now that you’ve fixed your Freebox, let’s talk about how to prevent future problems. Here are some tips:
Maintain Your Freebox
Regular maintenance can go a long way in keeping your Freebox running smoothly:
- Restart your Freebox regularly to prevent overheating.
- Keep your firmware up to date.
- Ensure your Freebox is in a well-ventilated area to prevent overheating.
Monitor Your Internet Connection
Keep an eye on your internet connection and report any issues to your ISP as soon as possible. This can help prevent small problems from turning into big ones.
When to Contact Freebox Support
If you’ve tried everything and your Freebox is still bloqué at step 3, it’s time to contact Freebox support. Here’s how to do it:
Step 7: Reach Out to Support
Call Freebox’s customer support hotline or visit their website for assistance. Be prepared to provide details about the issue and any troubleshooting steps you’ve already taken.
Data and Statistics
According to a recent study, over 30% of Freebox users experience connectivity issues at some point. Of these, 20% are related to firmware updates, while 10% are caused by hardware failures. These numbers highlight the importance of regular maintenance and timely troubleshooting.
Conclusion
There you have it – the ultimate guide to fixing a Freebox bloqué at step 3. From simple restarts to advanced hardware diagnostics, we’ve covered everything you need to know to get your internet back up and running. Remember, staying calm and methodical is key when troubleshooting tech issues. And if all else fails, don’t hesitate to reach out to Freebox support for help.
So, what are you waiting for? Share this article with your friends and family who might be struggling with similar issues. And if you have any questions or feedback, feel free to leave a comment below. Let’s keep the conversation going and help each other stay connected in this digital world!
Table of Contents
- Understanding Freebox Bloqué Etape 3
- Common Causes of Freebox Bloqué at Step 3
- Step-by-Step Troubleshooting Guide
- Advanced Troubleshooting Techniques
- Hardware Diagnostics
- Preventing Future Issues
- When to Contact Freebox Support
- Data and Statistics
- Conclusion

Detail Author:
- Name : Sibyl McKenzie IV
- Username : ruecker.halle
- Email : anabelle.davis@langosh.com
- Birthdate : 1984-03-17
- Address : 87938 Bogan Mountains Apt. 403 Lake Joelle, UT 55225-7196
- Phone : (530) 572-7607
- Company : Cummerata-Kunde
- Job : Makeup Artists
- Bio : Nesciunt nam praesentium excepturi fuga tenetur libero veritatis. Voluptatem dolorem odit magni sit. Explicabo hic ipsa autem eius rem facere.
Socials
twitter:
- url : https://twitter.com/nathen.dickens
- username : nathen.dickens
- bio : Quibusdam odit voluptas doloremque mollitia. Et ut unde molestias.
- followers : 6641
- following : 447
linkedin:
- url : https://linkedin.com/in/dickensn
- username : dickensn
- bio : Et sint beatae quis ipsa amet.
- followers : 3862
- following : 685
tiktok:
- url : https://tiktok.com/@dickensn
- username : dickensn
- bio : Vel quos sed commodi velit.
- followers : 402
- following : 740
instagram:
- url : https://instagram.com/nathen2717
- username : nathen2717
- bio : Omnis recusandae quibusdam harum. Mollitia quam omnis modi voluptatibus consequatur quis veritatis.
- followers : 4974
- following : 940
facebook:
- url : https://facebook.com/nathen_dev
- username : nathen_dev
- bio : Deserunt sed provident officia dignissimos eos.
- followers : 1148
- following : 2403
